# The Exploratory Void: CAD's Volume Desert Signals Reversal
## The Setup Architecture
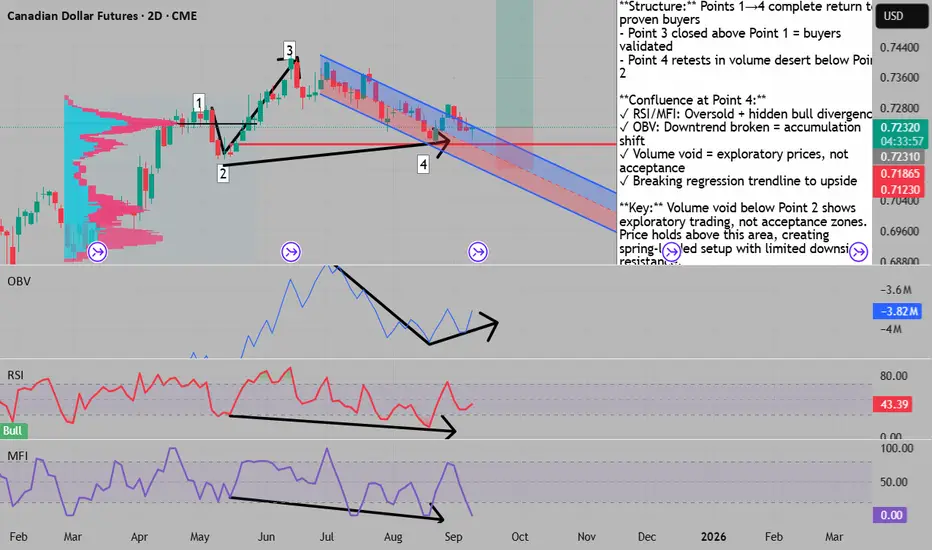
Price has completed a textbook return journey from **Point 1 to Point 4**, but the real story lies in what happened at **Point 3**. When Point 3 closed decisively above Point 1, it validated a critical market structure shift. Since Point 3 represents the terminus of the swing originating from Point 2, these levels now constitute **proven buyers** rather than the sellers who dominated at Point 1.
## The Volume Desert Phenomenon
The area below **Point 2** represents what I call a **"volume desert"** - a zone where trading activity has dried up to minimal levels. This isn't just low volume; it's a rejection of these price levels by the market collective. These sparse trades represent **exploratory probes** rather than areas of genuine acceptance. Importantly, **Point 4 respects this level by holding above Point 2**, refusing to enter the volume void - a bullish signal that buyers are defending higher ground.
## Convergence Signals at Point 4
**Momentum Oscillator Alignment**
• **RSI:** Oversold + Hidden bullish divergence
• **MFI:** Oversold + Hidden bullish divergence
The dual oversold readings combined with hidden divergences on both indicators suggest this pullback is exhausted.
**Volume Flow Reversal**
The **OBV downtrend line has been definitively broken**, indicating a shift in the underlying accumulation/distribution dynamics. Smart money appears to be accumulating during this retracement.
**Regression Channel Breakout**
Price action is currently **challenging the regression trendline to the upside**. Rather than rejecting from this mathematical mean, we're seeing acceptance above it - a bullish structural development.
## The Turning Point Reaction
The most recent bar at **Point 4** shows a textbook bullish reversal formation right at the critical juncture where multiple technical factors converge. This isn't a gradual turn; it's a **sharp rejection** that confirms buyers are defending this zone aggressively.
## Market Psychology Interpretation
The journey from **Points 1→4** tells a story of market psychology evolution:
• **Point 1:** Sellers in control
• **Point 2:** Initial buyer emergence
• **Point 3:** Buyers prove dominance by closing above Point 1
• **Point 4:** Retest of buyer commitment above the volume void
The lack of volume below Point 2 creates a **spring-like effect** - without sellers to provide resistance, any buying pressure can create outsized moves.
## Trade Dynamics
This setup combines:
• **Structural confirmation** (proven buyers at Point 3)
• **Technical divergences** (RSI/MFI)
• **Volume analysis** (both OBV breakout and volume void)
• **Mathematical validation** (regression line break)
The confluence suggests a **high-probability reversal scenario** where risk can be clearly defined below Point 4.
## Critical Observation
The fact that **Point 4 holds above Point 2** is particularly significant. Despite the retracement from Point 3, buyers defended the Point 2 level, refusing to let price enter the "exploratory" volume desert below. This respect for Point 2 as support, combined with the volume void beneath it, creates an **asymmetric opportunity**. The low-volume area below acts as a deterrent to further selling, while the proven buyer zone above Point 1 provides a target for the next expansion.
---
**Key Takeaway:** The convergence of volume void dynamics, momentum divergences, and structural support at Point 4 creates an institutional-grade reversal setup with clearly defined risk parameters.
## The Setup Architecture
Price has completed a textbook return journey from **Point 1 to Point 4**, but the real story lies in what happened at **Point 3**. When Point 3 closed decisively above Point 1, it validated a critical market structure shift. Since Point 3 represents the terminus of the swing originating from Point 2, these levels now constitute **proven buyers** rather than the sellers who dominated at Point 1.
## The Volume Desert Phenomenon
The area below **Point 2** represents what I call a **"volume desert"** - a zone where trading activity has dried up to minimal levels. This isn't just low volume; it's a rejection of these price levels by the market collective. These sparse trades represent **exploratory probes** rather than areas of genuine acceptance. Importantly, **Point 4 respects this level by holding above Point 2**, refusing to enter the volume void - a bullish signal that buyers are defending higher ground.
## Convergence Signals at Point 4
**Momentum Oscillator Alignment**
• **RSI:** Oversold + Hidden bullish divergence
• **MFI:** Oversold + Hidden bullish divergence
The dual oversold readings combined with hidden divergences on both indicators suggest this pullback is exhausted.
**Volume Flow Reversal**
The **OBV downtrend line has been definitively broken**, indicating a shift in the underlying accumulation/distribution dynamics. Smart money appears to be accumulating during this retracement.
**Regression Channel Breakout**
Price action is currently **challenging the regression trendline to the upside**. Rather than rejecting from this mathematical mean, we're seeing acceptance above it - a bullish structural development.
## The Turning Point Reaction
The most recent bar at **Point 4** shows a textbook bullish reversal formation right at the critical juncture where multiple technical factors converge. This isn't a gradual turn; it's a **sharp rejection** that confirms buyers are defending this zone aggressively.
## Market Psychology Interpretation
The journey from **Points 1→4** tells a story of market psychology evolution:
• **Point 1:** Sellers in control
• **Point 2:** Initial buyer emergence
• **Point 3:** Buyers prove dominance by closing above Point 1
• **Point 4:** Retest of buyer commitment above the volume void
The lack of volume below Point 2 creates a **spring-like effect** - without sellers to provide resistance, any buying pressure can create outsized moves.
## Trade Dynamics
This setup combines:
• **Structural confirmation** (proven buyers at Point 3)
• **Technical divergences** (RSI/MFI)
• **Volume analysis** (both OBV breakout and volume void)
• **Mathematical validation** (regression line break)
The confluence suggests a **high-probability reversal scenario** where risk can be clearly defined below Point 4.
## Critical Observation
The fact that **Point 4 holds above Point 2** is particularly significant. Despite the retracement from Point 3, buyers defended the Point 2 level, refusing to let price enter the "exploratory" volume desert below. This respect for Point 2 as support, combined with the volume void beneath it, creates an **asymmetric opportunity**. The low-volume area below acts as a deterrent to further selling, while the proven buyer zone above Point 1 provides a target for the next expansion.
---
**Key Takeaway:** The convergence of volume void dynamics, momentum divergences, and structural support at Point 4 creates an institutional-grade reversal setup with clearly defined risk parameters.
all my paid ( pro ) scripts can be obtained for a low price of 19.99 / month at : whop.com/sabr-pro-tools/access-to-all-pro-tools/
Haftungsausschluss
Die Informationen und Veröffentlichungen sind nicht als Finanz-, Anlage-, Handels- oder andere Arten von Ratschlägen oder Empfehlungen gedacht, die von TradingView bereitgestellt oder gebilligt werden, und stellen diese nicht dar. Lesen Sie mehr in den Nutzungsbedingungen.