Institutional Structure [Clean Pro]Institutional Structure — Script Explanation
This script is designed to map institutional market behavior using high-timeframe structure, not retail noise.
It focuses on where smart money acts, not on frequent signals.
🔹 1. High-Timeframe Support & Resistance (HTF S/R)
The script identifies major structural highs and lows using a higher lookback period.
Purpose:
Defines where institutions previously distributed or accumulated
Acts as natural decision zones
Filters out low-quality intraday levels
Why it matters:
Institutions trade from key HTF levels, not random support/resistance.
🔹 2. Equilibrium (50% Mean Price)
The equilibrium line represents the fair price between HTF high and low.
How it’s used:
Below equilibrium → discount zone (buy interest)
Above equilibrium → premium zone (sell interest)
Professional insight:
Smart money prefers buying discounts and selling premiums, not chasing price.
🔹 3. Market Structure Shift (MSS)
Instead of frequent BOS labels, the script detects true directional shifts.
Bullish MSS:
Price closes above previous HTF high
Bearish MSS:
Price closes below previous HTF low
Why MSS over BOS:
MSS confirms control change
Reduces false signals
Aligns with institutional execution logic
🔹 4. Liquidity Sweep Detection (Wick-Based)
The script identifies stop-hunt behavior using wick rejection logic.
Buy-side liquidity:
Wick above HTF high, but close back below
Sell-side liquidity:
Wick below HTF low, but close back above
Meaning:
Stops were triggered, but price failed to accept → smart money absorption
🔹 5. Fair Value Gap (FVG) – Refined Imbalance
Fair Value Gaps highlight inefficient price movement.
Bullish FVG:
Price leaves an upside imbalance
Bearish FVG:
Price leaves a downside imbalance
How pros use it:
As reaction zones, not entry signals
Best combined with liquidity + MSS
🔍 How Everything Works Together
The script is context-based, not signal-based:
1️⃣ HTF structure defines the battlefield
2️⃣ Liquidity is taken (stop hunts)
3️⃣ MSS confirms direction
4️⃣ FVG offers precision
5️⃣ Equilibrium filters bias
This creates high-probability trade environments, not overtrading.
📌 Best Practices (Professional Use)
Timeframes: 1H / 4H / Daily
Avoid lower TF noise
Trade only after liquidity is taken
Use FVG as confirmation, not trigger
Respect equilibrium bias
🎯 Summary
✔ Clean institutional logic
✔ No clutter, no spam
✔ HTF-driven decisions
✔ Liquidity-first mindset
✔ Designed for BTC, Gold & FX
🧠 Trade where institutions trade — not where indicators flash.
Technische Analyse

Cyberpunk Hyper-Linear ChannelCyberpunk Hyper-Linear Channel is a next-generation linear regression channel designed to visualize trend direction, volatility, and price positioning with high clarity and minimal noise.
Unlike traditional regression channels, this indicator applies EMA smoothing to both slope and intercept, significantly reducing sudden angle shifts and visual jitter.
The result is a stable, latency-controlled trend channel that adapts smoothly to market structure.
🔹 Core Concept
・Linear regression defines the trend axis
・Standard deviation determines dynamic channel width
・Slope & intercept smoothing improves structural stability
・Neon zones highlight bullish / bearish pressure in real time
🔹 Key Features
・Smoothed Linear Regression Channel (trend-focused, low noise)
・Volatility-based adaptive upper & lower boundaries
・Dynamic neon fill that reacts to price position
・Clear trend bias visualization without repainting clutter
・Cyberpunk-inspired, clean and modern aesthetic
🔹 How to Use
・Price near center line → Mean reversion / equilibrium zone
・Price approaching channel edges → Volatility expansion
・Upper zone dominance → Bullish trend pressure
・Lower zone dominance → Bearish trend pressure
・Breakouts beyond the channel may signal trend acceleration or exhaustion
🔹 Best Use Cases
・Trend-following confirmation
・Dynamic support & resistance mapping
・Market structure visualization across all assets
Cyberpunk Hyper-Linear Channel は、
トレンド方向・ボラティリティ・価格の位置関係を
ノイズを極力排除して可視化する次世代線形回帰チャネルです。
従来の線形回帰チャネルと異なり、
傾き(Slope)と切片(Intercept)の両方にEMAスムージングを適用。
これにより、角度の急変や視覚的ブレを抑えた
安定性の高いトレンド構造を描画します。
🔹 コンセプト
・線形回帰によるトレンド軸の定義
・標準偏差による動的チャネル幅
・スムージングで構造ノイズを低減
・価格位置に応じたネオンゾーンの動的強調表示
🔹 特徴
・低ノイズ・高安定な線形回帰チャネル
・ボラティリティ連動型の上下バンド
・価格位置に反応するダイナミックな発色
・リペイント感のないクリーンな描画
・サイバーパンク調の洗練されたデザイン
🔹 使い方
・中央線付近 → 平衡・持ち合いゾーン
・チャネル上限 / 下限付近 → ボラ拡大・圧力増加
・上部ゾーン優勢 → 上昇トレンド圧力
・下部ゾーン優勢 → 下降トレンド圧力
・チャネル外へのブレイクは加速 or 行き過ぎの兆候として注視
🔹 想定用途
・トレンドフォローの補助
・動的サポート / レジスタンスの把握
・相場構造の視覚的理解

Cyberpunk Vortex IndicatorCyberpunk Vortex Indicator is a visually enhanced Vortex-based momentum indicator designed to clearly capture trend strength and directional dominance.
This indicator calculates VI+ (bullish pressure) and VI− (bearish pressure) using the classic Vortex methodology, then renders them with a layered neon cyberpunk-style glow for maximum readability and impact.
🔹 Key Features
・Vortex Indicator (VI+ / VI−) with SMA smoothing
・Multi-layer laser-style glow (outer / inner / core lines)
・Clear visual distinction between bullish and bearish momentum
・Subtle background and fill effects for intuitive trend recognition
・Clean, modern design without clutter
🔹 How to Use
・VI+ above VI− → Bullish momentum dominates
・VI− above VI+ → Bearish momentum dominates
・The 1.0 baseline helps identify strengthening or weakening trends
・Best used as a trend confirmation tool, not a standalone signal
🔹 Recommended Timeframes
Works well across multiple timeframes.
Commonly effective on 15m, 1H, 4H, and higher.
This indicator focuses on clarity, aesthetics, and momentum visualization, making it ideal for traders who value both performance and design.
Cyberpunk Vortex Indicator は、トレンドの強さと方向性を直感的に把握するために設計された、視認性とデザイン性を重視したボルテックス系モメンタム指標です。
クラシックな Vortex Indicator(VI+ / VI−)をベースに、サイバーパンク調のネオン発光レイヤーで描画することで、買い圧力・売り圧力の優位性を一目で判断できます。
🔹 特徴
・Vortex Indicator(VI+ / VI−)をSMAでスムージング
・外側・内側・芯の3層レーザー風グロー表現
・上昇 / 下降モメンタムの視認性を大幅に向上
・控えめな背景・塗りつぶしで相場の空気感を演出
・ノイズの少ない、洗練されたデザイン
🔹 使い方
・VI+ が VI− を上回る → 上昇トレンド優勢
・VI− が VI+ を上回る → 下降トレンド優勢
・1.0 の基準線でトレンドの勢いを確認
・単体判断ではなく、トレンド確認用としての使用を推奨
🔹 推奨時間足
マルチタイムフレーム対応。
特に 15分足 / 1時間足 / 4時間足以上で安定。
本インジケーターは
「見やすさ」「美しさ」「モメンタムの可視化」を重視しており、
デザインと実用性の両立を求めるトレーダー向けです。

Liquidity O59 Elite QuantThis indicator is designed to make price areas that have attracted attention in the past, notable turning points, and the general market tendency easier to observe on the chart.
Its main purpose is to support a clearer and more visual reading of market structure.
🔍 General Approach
The indicator observes price behavior around the following aspects:
Previously notable price areas
How price interacts with these areas
Broader directional context derived from higher time frames
Zones where price has shown hesitation or rejection
These elements are displayed visually to assist interpretation and chart analysis.
📈 Level and Zone Representation
Certain notable highs and lows formed over time are tracked on the chart.
These areas may be displayed using lines or boxes.
When price interacts with them, they can be visually faded or optionally removed.
This approach helps keep the chart focused on currently relevant areas and reduces visual clutter.
⏱ Higher Time Frame Context
Information from a selected higher time frame can be projected onto the active chart.
This helps maintain awareness of the broader market context while working on lower time frames.
This feature is intended as contextual support rather than a standalone directional tool.
🧱 Rejection Areas
Zones where price shows noticeable hesitation or reaction are highlighted.
These zones are automatically cleared when they are no longer relevant.
The goal is to reflect evolving price behavior rather than fixed reference levels.
📉 Trend View
A simplified trend line is used to help visualize the general price tendency.
This line serves only as a visual guide and should not be used independently for decision-making.
🎨 Visual Aids
Optional candlestick coloring is available to highlight certain momentum conditions.
All visual elements such as colors and styles can be adjusted by the user.
⚠️ Important Notes
This study is provided for chart analysis and visualization purposes only.
It does not provide trade execution, predictions, or guarantees.
Results may vary depending on market conditions and user interpretation.
Personal judgment, experience, and risk awareness remain essential.

RSI Momentum Signal & O59 Elite QuantRSI Momentum Signal is a technical analysis indicator designed to highlight potential momentum-based reversal points using the Relative Strength Index (RSI).
This script combines short-term RSI momentum behavior with basic candle structure to visualize possible bullish and bearish reaction zones directly on the chart.
How It Works
A fast RSI-based momentum calculation is used to color price bars when short-term momentum reaches extreme levels.
Buy and Sell signals are generated when momentum conditions align with RSI overbought or oversold levels and basic candle direction.
All signals are plotted visually on the chart to support discretionary analysis.
Intended Use
This indicator is not a standalone trading system. It is designed to be used as a supportive analytical tool together with other technical analysis methods such as trend structure, price action, and support/resistance levels.
Dynamic Trendline (Filtered Price Tracking)
The trendline within the indicator uses a calculation structure that smooths and tracks price data. This structure aims to reduce the visual impact of short-term fluctuations and make the overall direction of the price more readable.
The trendline changes color depending on the direction of movement to visually distinguish directional changes. This color difference is for informational purposes only and makes it easier to track the trend direction on the chart.
Dashboard
The dashboard, which can be opened and closed optionally, contains:
The symbol being traded
Time period
Indicator information
The dashboard is for informational purposes only and does not impair the readability of the graph.
Disclaimer
This script does not provide financial advice and does not guarantee any trading results. All trading decisions remain the sole responsibility of the user.
Use this indicator for educational and analytical purposes only.

Cyberpunk Pattern Engine⚡ Cyberpunk Pattern Engine: Neon Technical Analysis
Upgrade your chart aesthetics while maintaining surgical precision. The Cyberpunk Pattern Engine is a high-performance pattern recognition script designed to identify classic reversal formations with a futuristic, neon-soaked visual style.
🛠️ Key Features
・Automated Pattern Detection: Real-time identification of four major price action structures:
・Double Top (DT) - Neon Pink
・Double Bottom (DB) - Neon Cyan
・Head & Shoulders (H&S) - Neon Green
・Inverse H&S (iH&S) - Neon Gold
・Cyber-Visuals: Uses the linefill engine to create semi-transparent glowing triangles, making chart patterns instantly recognizable without cluttering your price action.
・Dual-Language Support: Toggle labels between English and Japanese with a single click.
・Sensitivity Control: Adjust the "Pivot Period" and "Max Difference %" to filter out market noise and find only the most textbook-perfect setups.
🚀 How to Use
1. Pivot Period: Larger values find long-term trends; smaller values find scalp opportunities.
2. Max Difference: Controls how "equal" the tops/bottoms must be. Decrease for strict perfection, increase for more frequent signals.
3. Confirmation: The engine paints the completed pattern once the price crosses the neckline (confirmation level).
日本語版 (Japanese Description)
⚡ Cyberpunk Pattern Engine: ネオン・テクニカル・エンジン
チャート分析に「美学」と「精度」を。Cyberpunk Pattern Engineは、伝統的なチャートパターンを検出し、近未来的なサイバーパンク・スタイルで可視化する高性能インジケーターです。
🛠️ 主な機能
・自動パターン検出: 主要な4つの反転パターンをリアルタイムで識別します:
・ダブルトップ (DT) - ネオンピンク
・ダブルボトム (DB) - ネオンシアン
・三尊 / Head & Shoulders (H&S) - ネオングリーン
・逆三尊 / Inverse H&S (iH&S) - ネオンゴールド
・サイバー・ビジュアル: linefill機能を駆使し、半透明の光る三角形で描画。チャートの視認性を損なうことなく、瞬時に形状を把握できます。
・2ヶ国語対応: ラベル表示を日本語と英語で切り替え可能。
・感度カスタマイズ: 参照期間(Pivot Period)や許容誤差(Max Diff %)を調整することで、ノイズを排除し、自身のトレードスタイルに最適な形状のみを抽出できます。
🚀 使い方
1. 参照期間 (Pivot Period): 数値を大きくすると長期足レベルの大きな波を、小さくするとスキャルピング向けの小さな波を検出します。
2. 許容誤差: 頂点や肩の高さがどれくらい揃っていればパターンとみなすかを調整します。厳格な判断には数値を下げてください。
3. 確定条件: 価格がネックラインをブレイクし、パターンが完成したタイミングで描画が実行されます。

Educational Trend Direction (Up & Down)🔍 Overview
This indicator is designed to visually represent trend direction and trend transitions using a simple moving-average relationship. It is built strictly for educational and analytical purposes, allowing users to observe how price behaves during upward and downward market phases without relying on trading signals or predictions.
The indicator focuses on trend context, not trade execution.
⚙️ How the Indicator Works
The script calculates two exponential moving averages:
A fast trend line that reacts quickly to recent price changes
A slow trend line that represents broader market direction
Trend direction is determined by the relative position of these two lines.
When the fast line moves above the slow line, the market is considered to be in an upward trend phase
When the fast line moves below the slow line, the market is considered to be in a downward trend phase
This relationship helps visualize trend shifts and momentum changes in a simple and intuitive way.
🎨 Visual Components Explained
🟢 Green Trend Line
Represents the fast moving average during upward trend phases
Indicates that price is maintaining strength relative to the broader trend
Color reflects trend direction only, not confirmation or entry
🔴 Red Trend Line
Represents the fast moving average during downward trend phases
Indicates sustained weakness relative to the broader trend
Color does not imply selling or future continuation
⚪ Grey Trend Line
Represents the slow moving average
Acts as a baseline trend reference
Helps distinguish between short-term fluctuations and broader direction
🎨 Background Shading
Light green shading appears during upward trend environments
Light red shading appears during downward trend environments
Background color provides context only and does not signal market actions
🎯 Purpose & Benefits
Helps identify trend phases in a clear and minimal way
Improves understanding of trend transitions and momentum shifts
Reduces visual noise compared to raw price data
Encourages context-based analysis instead of signal dependency
Suitable for all markets and timeframes
⚠️ Important Notes
This indicator does not generate buy or sell signals
No targets, stop levels, or performance metrics are included
Trend conditions are descriptive, not predictive
Past behavior does not guarantee future outcomes
Users should always apply their own analysis and risk management when interpreting market data.
📚 Intended Use
This tool is intended for:
Market trend study
Educational demonstrations
Visual analysis of trend direction
Long-term chart structure awareness
It is not intended for automated trading or decision-making.

Volatility Spike SR Zones-AUTO Profile . Persistent . Neon📌 Overview
Volatility Spike SR Zones is a dynamic support–resistance zone strategy based on volatility spikes and volume filters.
It automatically identifies and clusters spike-based price levels, dynamically adapting to market volatility to visualize high-probability reversal or continuation zones in real time.
Alerts are triggered on bounce confirmations or invalidations for clear entry and exit signals.
⚠️ This strategy is provided for educational and research purposes only.
Past performance does not guarantee future results.
🎯 Strategy Objectives
The main goal is to detect zones where strong volatility spikes occur and price tends to reverse or consolidate.
Identify high-impact spike areas automatically
Provide consistent entry logic via bounce/invalid conditions
Auto-adjust to market type (FX, Gold, Crypto, Index)
✨ Key Features
ATR-based Zone Width: Zone width adapts automatically via ATR × profile coefficient for each market type
Volume Filtering: Detects “true” volatility spikes using SMA-based and recent-high volume thresholds
Persistent Drawing: Zones, midlines, and labels are stored and updated dynamically with nearest zones highlighted in neon
📊 Trading Rules
Long Entry: When the nearest support zone is touched and the close returns above it → trigger “Support Bounce Confirm” for entry.
Short Entry: When the nearest resistance zone is touched and the close returns below it → trigger “Resistance Bounce Confirm” for entry.
Exit / Reversal: Close positions immediately when the zone is invalidated (broken close beyond zone), or reverse if opposite bounce confirmation occurs.
💰 Risk Management Parameters
Market / Timeframe: Any (auto-detects FX / Gold / Crypto / Index; recommended M5–H4)
Account Size: $10,000 (example; adjustable)
Commission: 0.02% (example)
Slippage: 2 pips (example)
Risk per Trade: 1.0% (example)
Number of Trades (test period): variable (depends on market & timeframe)
※ All parameters can be adjusted according to your broker conditions and trading plan.
⚙️ Trading Parameters & Considerations
Indicator Name: Volatility Spike SR Zones (AUTO Profile • Persistent • Neon)
Main Inputs:
Lookback (pd): 22 (volatility evaluation window)
BB StDev Mult (mult): 2.0 (Bollinger Band deviation multiplier)
ATR Length: 14 (zone width adaptation)
Auto Profile Logic:
Automatically switches between FX / Gold / Crypto / Index parameters
Volume filter uses SMA × multiplier or recent max breakout
Zone width can use ATR-based or fixed tick width (recommended: ATR)
🖼 Visual Support
Support zones = green; Resistance zones = red; Nearest zones glow (Neon highlight)
Midline (dotted), zone labels with touch count and profile name
Safety-limited drawing for performance and stability
🔧 Strategy Improvements & Uniqueness
Inspired by volatility-based SR and Bollinger spike detection concepts, this strategy introduces:
Auto profile optimization for each market type (ATR & volume thresholds)
Clustering and scoring system for “most active” zones
Persistent drawing with real-time nearest zone highlights and invalidation alerts
Compared to static horizontal or pivot-based SR, it focuses on volume-backed demand/supply levels for higher signal reliability.
⏱ Practical Entry Guidance
Enter immediately after a bounce confirmation candle
Stop Loss: just beyond the opposite side of the zone (≈ 0.5–1× ATR)
Take Profit: 1.5R–2R or near the next opposite zone
Reduce position size around high-volatility events to avoid false invalidations
✅ Summary
Volatility Spike SR Zones combines volatility spike detection, adaptive ATR-based zone sizing, and volume confirmation to identify powerful reaction zones automatically.
It offers clear visual cues and alert-based trade logic, making it suitable for both discretionary and semi-automated trading systems.
⚠️ This strategy is based on historical data and does not guarantee future profits. Always apply proper risk management and forward testing before live trading.

TTM SqueezeUpdated TTM Squeeze — Correct AND Logic
John Carter’s classic TTM Squeeze.
There is one on here already, but it is using an OR‑based condition. The proper logic is AND for a true volatility squeeze. Both the Keltner Channel lower band and upper band must sit fully inside the Bollinger Bands. Using AND logic ensures the squeeze only triggers when volatility is genuinely compressed, producing a more accurate and reliable signal than the default implementation.

MAD Supertrend [Alpha Extract]A sophisticated SuperTrend implementation that replaces traditional ATR calculations with Mean Absolute Deviation methodology for adaptive volatility measurement and band construction. Utilizing SMA baseline with MAD-based deviation bands and optional adaptive factor adjustments, this indicator delivers institutional-grade trend detection with strength-based filtering and dynamic visual feedback. The system's MAD approach provides superior noise reduction compared to ATR while maintaining responsiveness to genuine volatility changes, combined with momentum-based strength calculations for high-conviction signal generation.
🔶 Advanced MAD-Based Band Construction
Implements Mean Absolute Deviation calculation as volatility proxy, measuring absolute price deviations from mean and smoothing for stable band generation without ATR dependency. The system calculates SMA baseline, computes MAD from configurable lookback period, applies factor multipliers to create upper and lower bands, then implements classic SuperTrend ratcheting logic where bands only adjust when price violates previous levels or calculations warrant updates.
// Core MAD SuperTrend Framework
SMA_Value = ta.sma(src, SMA_Length)
Mean = ta.sma(src, MAD_Length)
Abs_Deviation = abs(src - Mean)
MAD_Value = ta.sma(Abs_Deviation, MAD_Length)
// Band Construction with Ratcheting
Upper_Band = SMA_Value + MAD_Factor * MAD_Value
Lower_Band = SMA_Value - MAD_Factor * MAD_Value
// Ratcheting logic prevents premature band adjustments
🔶 Adaptive Factor Adjustment Engine
Features optional adaptive multiplier system that modulates MAD factor based on normalized MAD magnitude relative to recent extremes, creating bands that automatically expand during high-volatility regimes and contract during consolidation. The system applies min-max normalization to MAD values over configurable lookback, multiplies by adaptation parameter, and adds to base factor for dynamic volatility sensitivity without manual recalibration.
🔶 Momentum-Based Strength Filter
Implements sophisticated strength calculation measuring price momentum relative to baseline divided by volatility-adjusted MAD bands, producing normalized 0-1 strength scores with exponential smoothing. The system calculates distance from SMA baseline, normalizes by MAD-derived band width, and applies configurable minimum threshold requiring sufficient momentum before trend signals activate, filtering weak or choppy market conditions.
🔶 SuperTrend Direction Logic
Utilizes classic SuperTrend methodology adapted for MAD bands where trend direction flips on opposite band violations with state persistence until confirmation. The system tracks whether price closes above upper band (bearish flip to bullish) or below lower band (bullish flip to bearish), maintains directional state until opposing violation occurs, and generates binary +1/-1 trend signals suitable for systematic position management.
🔶 Intelligent Candle Sticking System
Provides advanced line positioning option that anchors SuperTrend line to candle wicks or bodies rather than pure calculation values for enhanced visual clarity. The system supports two modes: Wick (positions at high/low extremes based on trend direction) and Body (constrains line between calculation and candle extremes), creating cleaner chart presentation while maintaining mathematical integrity of underlying signals.
🔶 Dynamic Gradient Visualization Framework
Implements color intensity modulation based on smoothed strength calculations, transitioning from muted to vivid hues as momentum conviction increases. The system applies gradient interpolation using strength ratio, creating visual feedback where strong trending moves display intense colors while weak or consolidating conditions show faded tones across trend line, channel bands, and candle coloring for immediate regime assessment.
🔶 MAD Channel Architecture
Features volatility-adjusted channel bands centered on baseline or candle-stuck line with configurable multiplier for support/resistance visualization. The system calculates upper and lower bounds using MAD values scaled by adaptive factors and channel multipliers, applies dynamic transparency based on trend strength, and creates filled regions that intensify during strong trends and fade during weak conditions.
🔶 Multi-Layer Glow Effect System
Provides sophisticated line rendering with triple-layer plot system creating glow effect through progressively wider and more transparent outer layers. The system plots core trend line at specified width with full color intensity, adds inner glow layer at +2 width with moderate transparency, and outer glow at +4 width with higher transparency, creating visual depth and emphasis without cluttering chart space.
🔶 Strength-Based State Management
Implements intelligent trend state logic requiring both directional signal and minimum strength threshold breach before confirming trend transitions. The system calculates raw SuperTrend direction, evaluates smoothed strength against configurable minimum, generates filtered trend state that can be bullish (+1), bearish (-1), or neutral (0), and maintains state persistence using hold logic that prevents oscillation during ambiguous conditions.
🔶 Comprehensive Alert Integration
Generates trend flip alerts when filtered state transitions from bearish to bullish or bullish to bearish with full confirmation requirements satisfied. The system detects state changes through comparison with previous bar, triggers single alert per transition rather than continuous notifications, and provides customizable message templates for automated trading system integration or manual notification preferences.
🔶 Performance Optimization Architecture
Utilizes efficient calculation methods with null value handling, nz() functions preventing errors during initialization bars, and optimized gradient calculations. The system includes intelligent state persistence minimizing recalculation overhead, streamlined MAD computation avoiding redundant mean calculations, and smooth visual updates maintaining consistent performance across extended historical periods.
This indicator delivers sophisticated SuperTrend analysis through Mean Absolute Deviation methodology providing superior statistical properties compared to traditional ATR-based approaches. MAD calculations offer more robust volatility measurement resistant to extreme outliers while maintaining sensitivity to genuine market regime changes. The system's adaptive factor adjustment, momentum-based strength filtering, and dynamic visual feedback make it essential for traders seeking reliable trend-following signals with reduced false breakouts during choppy conditions. The combination of MAD bands, candle-sticking options, gradient strength visualization, and comprehensive filtering creates institutional-grade trend detection suitable for systematic approaches across cryptocurrency, forex, and equity markets with clear entry/exit signals and comprehensive alert capabilities.

Support & Resistance Automated📌 Support and Resistance Automated (Pivot-Based)
Support and Resistance Automated is a lightweight and fully automated indicator that plots key support and resistance levels using pivot highs and pivot lows. It helps traders quickly identify important price reaction zones without manual drawing.
This indicator is especially useful for price-action traders, swing traders, and intraday traders who rely on clean charts and objective levels.
🔍 How It Works
Pivot Highs → Resistance Levels
Pivot Lows → Support Levels
Each detected pivot creates a horizontal dotted line that extends forward, allowing you to observe how price reacts over time.
Once a level is formed, it is kept permanently on the chart — no repainting, no disappearing levels.
⚙️ Customizable Settings
You can easily adjust:
Left & Right Pivot Bars – control how strong a pivot must be
Line Extension Length
Line Width
Support & Resistance Colors
Show / Hide Pivot Highs and Pivot Lows independently
This flexibility allows the indicator to adapt to intraday, swing, or higher-timeframe analysis.
✅ Key Features
✔ Fully automatic support & resistance detection
✔ Based on proven pivot-point logic
✔ No repainting
✔ Clean, minimal chart appearance
✔ Unlimited support & resistance levels
✔ Works on all timeframes & instruments
📈 Best Use Cases
Identifying key demand and supply zones
Planning entries, targets, and stop-losses
Confluence with price action, RSI, moving averages
Breakout and rejection-based strategies

Smart Money Volume Index [AlgoAlpha]🟠 OVERVIEW
This script measures buying and selling interest by comparing how price behaves on rising volume versus falling volume. It separates what is often called “smart money” activity from more passive volume and turns that relationship into a normalized index. The result is an oscillator that shows whether buyers or sellers are in control, how strong that control is, and when interest reaches extreme levels that tend to matter for reversals or continuations.
🟠 CONCEPTS
The calculation starts by splitting volume flow into two streams. Positive Volume Index (PVI) reacts when volume expands, while Negative Volume Index (NVI) reacts when volume contracts. Each stream is detrended with a long EMA and passed through an RSI calculation to express relative pressure. These two RSIs are then compared as ratios to estimate buy-side and sell-side interest. The values are summed over a rolling window and normalized against historical peaks so the output stays bounded and comparable across markets. In simple terms: relative behavior on high-volume vs low-volume bars defines interest , and normalization makes that interest readable over time.
🟠 FEATURES
Two display modes: Compare (separate buy and sell interest) and Net (single combined oscillator)
High-interest threshold zones with visual highlights
Alert conditions for threshold crosses and zero-line shifts
🟠 USAGE
Setup : Add the script to your chart. Choose Net mode for a clean momentum-style read, or Compare mode to see buy and sell interest separately. Start with the default periods, then adjust the Index Period to control how much history is included.
Read the chart : Values above zero mean buy-side interest dominates; below zero means sell-side interest dominates. In Compare mode, the green line tracks buying interest and the red line tracks selling interest. When either side pushes beyond the high-interest threshold, participation is elevated and moves tend to be more meaningful.
Settings that matter : Increasing the Index Period smooths the index and focuses on longer participation trends. Changing the Volume Flow Period alters how sensitive the RSI-based pressure is. The High Interest Threshold controls how selective extreme signals are and directly affects alerts and zone highlights.

The Bubble Strategy By HoneyMoneyFX🟢 The Bubble Strategy by HoneyMoneyFX
The Bubble Strategy is built to help traders instantly understand market bias across multiple timeframes, allowing for clearer, faster, and more confident trading decisions — without constantly switching charts.
🔍 Multi-Timeframe Info Panels
The indicator displays info panels for multiple timeframes at once, showing whether each timeframe is in:
LONG (bullish)
SHORT (bearish)
CONSOLIDATION
This makes it easy to see the overall structure and direction of price, helping traders align lower-timeframe entries with higher-timeframe momentum.
🎯 Buy & Sell Signals (High-Probability Entries)
Buy and Sell signals appear only when price enters both:
a 4H Bubble
and a 15-Minute Bubble
of the same type (both LONG or both SHORT)
This ensures signals are taken in the direction of higher-timeframe bias, not against it.
Signal Logic
BUY signal → 4H LONG + 15m LONG
SELL signal → 4H SHORT + 15m SHORT
🛑 Risk Management (Fixed & Simple)
Stop-Loss: EMA 200 (purple line)
Base Risk-Reward Ratio: 2.0R
This keeps risk management consistent and rule-based.
📈 Risk-Reward Scaling with Confluence
The strategy allows higher risk-reward when market conditions are stronger.
RSI Rules
LONG positions
RSI must be below 61
RSI above 61 is considered overbought, weakening the setup
SHORT positions
RSI must be above 39
RSI below 39 is considered oversold, weakening the setup
Examples
Best-case scenario
All info panels from 1m → 4H are GREEN
RSI across panels is below 61
👉 Risk-Reward of 4.0R or more is possible
Standard setup
Only 4H and 15m panels align
Average RSI below 61 (for longs)
👉 Risk-Reward = 2.0R
More alignment = stronger move = higher potential reward.
⚠️ Important Trading Rule
It is strongly recommended to:
Trade ONLY inside 4H LONG or SHORT bubbles
NEVER trade during 4H CONSOLIDATION bubbles
This dramatically reduces false signals and improves consistency.
📚 Education & Strategy Guides
Detailed guides on how to correctly use the Bubble Strategy will be posted on:
TikTok
YouTube
Instagram
These guides will teach you how to:
Filter real signals from fake ones
Trade scalping and swing setups
Combine info panels, RSI, and structure properly
🌍 Markets Supported
The Bubble Strategy works on:
✅ Forex (especially optimized)
✅ Stocks
✅ Crypto
Usable for scalping, day trading, and swing trading.
🔓 Access & Trial
You can freely use The Bubble Strategy by purchasing access at:
👉 honeymoneyfx.com
Includes a 30-day free trial
Full access to all features during the trial
----------------------------------------------------------
Desclaimer -
Trading in financial markets involves significant risk and is not suitable for everyone.
The Bubble Strategy by HoneyMoneyFX is provided for educational and informational purposes only and does not constitute financial advice, investment advice, or a recommendation to buy or sell any financial instrument.
Past performance is not indicative of future results. Market conditions change, and no strategy can guarantee profits or eliminate risk entirely. Losses can exceed expectations if proper risk management is not applied.
All Buy and Sell signals generated by this indicator should be independently verified and used at your own discretion. You are fully responsible for your trading decisions, including risk sizing, stop-loss placement, and trade execution.
This indicator does not account for personal financial circumstances, risk tolerance, or trading experience. Always trade with capital you can afford to lose.
It is strongly recommended to:
Backtest the strategy thoroughly
Use proper risk management at all times
Avoid trading during unfavorable market conditions
By using this indicator, you acknowledge that HoneyMoneyFX and its affiliates are not liable for any losses, damages, or financial outcomes resulting from its use.

Sakata Reversal MatrixThis indicator automatically detects key candlestick reversal patterns based on the traditional Japanese "Sakata Five Methods."
Key Features: Identifies patterns such as Hammer, Engulfing, Harami, Piercing/Dark Cloud, and Gaps (Sanku).
Strict Star Detection: "Morning Star" and "Evening Star" signals are filtered using a strict logic where the second candle (the star) must be visually isolated from the surrounding candles.
High-Accuracy Filter: Combines RSI (below 30 or above 70) with Bollinger Bands to ensure signals appear only during overbought or oversold conditions, reducing false signals.
Bilingual Support: Easily toggle between Japanese and English labels in the settings.
このインジケーターは、日本の伝統的な相場分析法である「酒田五法」をベースに、主要な反転ローソク足パターンを自動検知します。
主な機能: ハンマー(首吊り線)、包み足、はらみ足、切り込み線、三空などを表示。
厳格な明星判定: 「明けの明星」「宵の明星」は、2本目のローソク足の実体が前後の足から窓を開けて孤立している場合のみ検知する厳格なロジックを採用しています。
高精度フィルタ: RSI(35以下/65以上)とボリンジャーバンドを組み合わせ、相場が過熱しているポイントでのみサインを出すことで、騙しを軽減しています。
バイリンガル対応: 設定から日本語と英語の表示を切り替え可能です。

Volume-Adjusted CCI Trend [Alpha Extract]A sophisticated trend identification system that combines dual EMA direction analysis with volume-weighted normalization and CCI momentum filtering for comprehensive trend validation. Utilizing Volume RSI integration and standard deviation-based bands that expand and contract with volume characteristics, this indicator delivers institutional-grade trend detection with multi-layered confirmation requirements. The system's volume adjustment mechanism modulates signal sensitivity based on participation strength while CCI thresholds prevent false signals during weak momentum conditions, creating a robust trend-following framework with reduced whipsaw susceptibility.
🔶 Advanced Dual EMA Direction Engine
Implements fast and slow exponential moving average comparison to establish primary trend direction bias with configurable period parameters for timeframe optimization. The system calculates trend direction as binary +1 (bullish when fast EMA exceeds slow EMA) or -1 (bearish when slow exceeds fast), providing foundational directional input that requires additional confirmation before generating actionable trend states.
🔶 Volume-Adjusted Normalization Framework
Features sophisticated normalization calculation that measures price deviation from basis EMA, scales by standard deviation, then applies volume-weighted adjustment factor for participation-sensitive signal generation. The system calculates Volume RSI to quantify relative volume strength, converts to ratio format, and multiplies normalized deviation by volume factor scaled by impact parameter, creating signals that strengthen during high-volume confirmations and weaken during low-volume moves.
// Volume-Adjusted Normalization
Vol_Ratio = Volume_RSI / 50
Vol_Factor = 1 + (Vol_Ratio - 1) * Vol_Impact
Dev = src - Basis_EMA
Raw_Normalized = Dev / (StdDev * Multiplier)
Vol_Adjusted_Norm = Raw_Normalized * Vol_Factor
🔶 CCI Momentum Filter Integration
Implements Commodity Channel Index threshold system with configurable upper and lower bounds to validate trend strength and filter sideways market conditions. The system calculates standard CCI with adjustable length, compares against asymmetric thresholds (default +100 bullish, -50 bearish), and requires CCI confirmation in addition to EMA direction and normalized deviation before transitioning trend states, ensuring only high-conviction signals generate entries.
🔶 Multi-Layer Trend State Logic
Provides intelligent trend state machine requiring simultaneous confirmation from EMA direction, volume-adjusted normalization threshold breach, and optional CCI momentum validation. The system maintains persistent trend state that only transitions when all three conditions align, preventing premature reversals during temporary retracements or low-volume fluctuations while capturing genuine trend changes with institutional-grade confirmation requirements.
🔶 Dynamic Volume Band Architecture
Creates volatility-adjusted bands around basis EMA using standard deviation multiplied by volume factor, producing channels that widen during high-volume periods and contract during low-volume consolidations. The system applies identical volume adjustment to band calculations as normalization metric, ensuring visual envelope consistency with underlying signal logic and providing intuitive reference boundaries for trend-following price action.
🔶 Gradient Strength Visualization System
Implements color intensity modulation based on normalized signal strength relative to threshold requirements, creating visual feedback that communicates trend conviction. The system calculates strength ratio by dividing absolute normalized value by threshold, caps at 1.0, and applies gradient interpolation from muted to vivid colors, instantly conveying whether current trend exhibits marginal or strong characteristics through line and candle coloring.
🔶 Volume RSI Calculation Engine
Utilizes RSI methodology applied to volume series rather than price to quantify relative participation strength with normalization to 0.5-1.5 range for factor multiplication. The system processes volume through standard RSI calculation, divides by 50 to center around 1.0, and produces ratio values where readings above 1.0 indicate above-average volume and below 1.0 suggest below-average participation for signal adjustment purposes.
🔶 Asymmetric Threshold Configuration
Features separate positive and negative normalization thresholds with independent CCI upper and lower bounds enabling optimization for bullish versus bearish signal generation characteristics. The system defaults to symmetric normalized thresholds (±0.2) but asymmetric CCI levels (+100/-50), recognizing that bullish momentum often requires stronger confirmation than bearish reversals in typical market structures.
🔶 Comprehensive Visual Integration
Provides multi-dimensional trend visualization through color-coded basis line, volume-adjusted bands with gradient fills, trend-synchronized candle coloring, and transition signal labels. The system enables selective display toggling for each visual component while maintaining consistent color scheme and strength-based intensity across all elements for cohesive chart presentation without overwhelming information density.
🔶 Alert and Signal Framework
Generates trend change alerts when state transitions occur with all confirmation requirements satisfied, providing notifications for bullish (transition to +1) and bearish (transition to -1) signals. The system implements state change detection through comparison with previous bar trend state, ensuring single alert per transition rather than continuous notifications during sustained trends.
🔶 Performance Optimization Architecture
Employs efficient calculation methods with null value handling for Volume RSI initialization and nz() functions preventing calculation errors during early bars. The system includes intelligent state persistence maintaining previous trend during ambiguous conditions and optimized gradient calculations balancing visual quality with computational efficiency across extended historical periods.
🔶 Why Choose Volume-Adjusted CCI Trend ?
This indicator delivers sophisticated trend identification through multi-layered confirmation combining directional EMA analysis, volume-weighted normalization, and momentum validation via CCI filtering. Unlike traditional trend indicators relying solely on price-based calculations, the volume adjustment mechanism ensures signals strengthen during high-participation moves and weaken during low-volume drifts, reducing false breakouts and choppy market whipsaws. The system's requirement for simultaneous EMA direction, normalized threshold breach, and CCI momentum confirmation creates institutional-grade signal quality suitable for systematic trend-following approaches across cryptocurrency, forex, and equity markets. The volume-adjusted bands provide dynamic support/resistance references while the gradient strength visualization enables instant assessment of trend conviction for position sizing and risk management decisions.

Advanced Order Block Visualization ToolAdvanced Order Block Visualization Tool
Description:
This custom TradingView indicator is designed to enhance the visualization and analysis of order blocks across all timeframes. It accurately identifies and displays order blocks based on specific criteria, helping traders make informed decisions.
Key Features:
Accurate identification of order blocks using advanced algorithms
Improved visibility and clarity of order blocks, even on lower timeframes
Customizable settings to adapt to different trading styles and preferences
Intelligent filtering to display only the most relevant order blocks
Inclusion of internal order blocks for a comprehensive view of market structure
Efficient and optimized code for smooth performance
Usage Instructions:
Add the indicator to your TradingView chart
Customize the settings according to your preferences (e.g., input.int(), input.float(), etc.)
Analyze the displayed order blocks in conjunction with your trading strategy
Use the insights gained to make informed trading decisions
Note: This indicator is designed to aid in analysis and decision-making but does not constitute financial advice. Always use discretion and risk management when trading.
Feedback and Support:
If you encounter any issues, have suggestions for improvement, or need assistance, please feel free to contact me via the TradingView chat or leave a comment on the indicator's page. I appreciate your feedback and strive to continuously enhance the indicator's performance.
Happy trading!

Flow EMA [Stansbooth]Flow EMA is not just an average—it's a flow predictor. It tracks the real-time strength and direction of the market, allowing traders to stay ahead of trend shifts. Whether the market is trending or consolidating, Flow EMA smoothly adapts to price action and reveals where the smart flow is moving. Perfect for traders who want clarity, confidence, and consistency.

Moving Averages 20, 50, 150, 200This indicator plots four commonly used Simple Moving Averages on the price chart: 20, 50, 150, and 200.
It is designed to help traders easily identify short-term, medium-term, and long-term trend direction, as well as key crossover events.
Features:
SMA 20 (purple) – short-term momentum
SMA 50 (greenish) – intermediate trend
SMA 150 (yellow) – long-term bias
SMA 200 (orange) – major trend direction
Visual crossover markers for:
SMA 20 / SMA 150
SMA 50 / SMA 200
The indicator uses Pine Script® v6 and is fully compatible with the latest TradingView platform.
All moving average lengths can be customized in the settings.
This script is intended for trend analysis and confirmation and can be used across all markets and timeframes.

Swing Failure Signals [AlgoAlpha]🟠 OVERVIEW
This script detects swing failure patterns by tracking how price interacts with recent swing highs and lows, then confirming those sweeps with a change in candle behavior. The goal is to highlight areas where price briefly breaks a key level, fails to continue, and then shifts direction. These events often occur around liquidity runs, where stops are triggered before price reverses. The script draws levels, colors bars, and prints clear markers to help visualize where these failures occur and when they are confirmed.
🟠 CONCEPTS
The logic starts with pivot-based swing detection. Recent swing highs and lows are stored and monitored. When price trades beyond one of these levels within a defined historical window, it is treated as a sweep. A sweep alone is not enough. The script then waits for a Change in State of Delivery (CISD), which is defined by a shift in candle structure that shows follow-through in the opposite direction. A tolerance filter measures how far price traveled beyond the level relative to the reaction that followed. If the reaction is strong enough and happens within a limited number of bars, the sweep is validated as a swing failure. In short: the swing defines the reference, the sweep shows intent, and the CISD confirms acceptance or rejection.
🟠 FEATURES
Sweep detection with a maximum lookback to avoid outdated levels
CISD confirmation using candle structure and price expansion
Alert conditions for bullish and bearish swing failures
🟠 USAGE
Setup : Add the script to your chart. It works on any market and timeframe. Lower timeframes highlight intraday liquidity runs, while higher timeframes show structural failures. Start with the default inputs before adjusting.
Read the chart : A bullish swing failure occurs when price sweeps a prior low, then reverses and confirms with a bullish CISD. A bearish swing failure is the opposite, sweeping a prior high and confirming with a bearish CISD. Dashed lines mark the swept swing. Solid lines mark the CISD level. Bars are colored while the SFP state is active.
Settings that matter : Increasing Pivot Detection Length finds more significant swings but fewer signals. Reducing Max Pivot Point Edge limits how far back sweeps are allowed, keeping signals more current. The Patience setting controls how many bars are allowed for confirmation after a sweep. The Trend Noise Filter raises or lowers how strong the reaction must be to qualify as a valid failure.

Market Entropy [Alpha Extract]A sophisticated information theory-based market analysis system that measures price randomness and structural order using Shannon entropy calculations across price, returns, and volume distributions. Utilizing adaptive percentile-based thresholds and multi-timeframe confirmation, this indicator delivers institutional-grade regime classification distinguishing between structured trending conditions and chaotic ranging environments. The system's composite entropy framework combined with dynamic gradient visualization and MTF alignment validation provides comprehensive market state assessment for optimal strategy selection and risk management.
🔶 Advanced Shannon Entropy Engine
Implements pure information theory methodology using histogram distribution analysis with configurable bin counts to calculate normalized entropy values for price, returns, and volume metrics. The system constructs probability distributions from rolling windows, applies logarithmic entropy calculations, and normalizes against theoretical maximum entropy to produce 0-1 bounded measurements of market randomness and predictability.
float entropy = 0.0
float total = float(len)
for i = 0 to bins - 1
float count = array.get(bin_counts, i)
if count > 0
float prob = count / total
entropy -= prob * math.log(prob) / math.log(2)
float max_entropy = math.log(bins) / math.log(2)
result := entropy / max_entropy
🔶 Adaptive Percentile Threshold System
Features intelligent threshold determination using rolling percentile calculations over configurable calibration periods to establish structure and chaos zones that adapt to changing market characteristics. The system calculates lower percentile for structure threshold (ordered markets) and upper percentile for chaos threshold (random markets), enabling regime classification that adjusts automatically to market evolution.
🔶 Multi-Timeframe Alignment Framework
Implements comprehensive MTF entropy analysis retrieving composite entropy from three configurable higher timeframes with alignment validation logic. The system calculates divergence between current timeframe entropy and higher timeframe values, generating confirmation signals only when all timeframes exhibit entropy agreement within tolerance bands for enhanced signal reliability.
🔶 Three-Regime Classification Engine
Provides sophisticated market state determination classifying conditions as structure (entropy below lower threshold), chaos (entropy above upper threshold), or neutral (entropy between thresholds) with regime strength measurement. The system tracks regime transitions and calculates conviction scores based on distance from thresholds, enabling nuanced assessment of market order versus randomness.
🔶 Composite Entropy Architecture
Combines three distinct entropy measurements weighted by relevance to create unified market randomness metric with exponential smoothing for stability. The system applies 40% weight to price entropy (distribution shape), 35% to return entropy (movement patterns), and 25% to volume entropy (participation randomness), capturing comprehensive market microstructure information.
🔶 Dynamic Gradient Visualization System
Features advanced color blending engine that transitions between primary and secondary colors based on entropy momentum intensity with glow effects for conviction emphasis. The system calculates entropy rate of change, normalizes against recent extremes, and applies smooth color interpolation from secondary to primary hues as momentum intensifies, creating intuitive visual representation of regime strength.
🔶 Intelligent Zone Fill Architecture
Implements multi-layer gradient fills within structure and chaos zones that intensify as entropy moves deeper into extremes, providing immediate visual feedback on regime conviction. The system creates three-tier gradient levels at 33%, 66%, and 100% penetration into zones with progressively lower transparency, emphasizing extreme entropy conditions requiring attention.
🔶 Momentum-Based Divergence Detection
Generates entry signals when entropy crosses below bull divergence level or above bear divergence level, identifying potential regime transitions before price confirmation. The system monitors entropy momentum direction during threshold crossings and validates with MTF alignment, producing high-probability reversal signals at entropy extremes.
🔶 Normalized Display Framework
Provides 0-100 scaled visualization using adaptive min-max normalization calculated from percentile analysis, ensuring consistent visual interpretation across different market conditions and instruments. The system transforms raw composite entropy into normalized space with dynamic thresholds, enabling cross-market and cross-timeframe entropy comparison.
🔶 Regime Strength Measurement
Calculates conviction scores measuring depth of entropy penetration into structure or chaos zones relative to historical ranges, quantifying how definitively current conditions favor trending versus ranging strategies. The system produces 0-1 strength values that modulate visual intensity and can inform position sizing or strategy allocation decisions.
🔶 Performance Optimization Framework
Utilizes efficient array operations with optimized histogram calculations and configurable lookback limits to balance accuracy with computational efficiency. The system includes intelligent caching of percentile calculations and streamlined probability summations for smooth real-time entropy updates across extended historical periods.
🔶 Why Choose Market Entropy ?
This indicator delivers sophisticated market regime analysis through pure information theory methodology measuring actual randomness versus structure in price behavior. Unlike traditional volatility or trend indicators that measure price movement characteristics, Market Entropy quantifies the fundamental predictability of market conditions using Shannon entropy calculations. The system's composite approach combining price, return, and volume distributions with adaptive thresholds, MTF confirmation, and gradient visualization makes it essential for traders seeking objective regime classification to optimize strategy selection. Low entropy (structure zone) indicates ordered, trending conditions favorable for directional strategies, while high entropy (chaos zone) signals random, ranging markets better suited for mean reversion or reduced exposure. The indicator excels at identifying regime transitions before they become obvious in price action across cryptocurrency, forex, and equity markets.

SMA MAD Trend [Alpha Extract]A sophisticated trend identification system that combines Simple Moving Average with Mean Absolute Deviation methodology to create adaptive Super Trend-style bands with advanced strength filtering and gradient visualization. Utilizing ADX-based trend strength validation and slope analysis for signal quality enhancement, this indicator delivers institutional-grade trend detection with dynamic ATR-based ribbon visualization and comprehensive strength measurement. The system's dual-filter architecture eliminates false signals during weak or choppy market conditions while maintaining sensitivity to genuine trend establishment and reversal events.
🔶 Advanced SMA-MAD Band Construction
Implements innovative Mean Absolute Deviation calculation around Simple Moving Average baseline to create volatility-adaptive bands with ratcheting logic for trend persistence. The system calculates MAD by measuring absolute price deviations from the mean, then applies configurable multipliers to generate upper and lower bands that adjust to changing market conditions while preventing premature band violations.
// Core SMA-MAD Framework
SMA_Value = ta.sma(close, SMA_Length)
Mean = ta.sma(close, MAD_Length)
Abs_Deviation = abs(close - Mean)
MAD_Value = ta.sma(Abs_Deviation, MAD_Length)
// Adaptive Bands
Upper_Band = SMA_Value + MAD_Factor * MAD_Value
Lower_Band = SMA_Value - MAD_Factor * MAD_Value
🔶 Intelligent Dual-Filter System
Features comprehensive trend validation using ADX strength measurement and slope analysis to eliminate low-conviction signals during ranging or consolidating markets. The system calculates normalized slope strength using ATR scaling and combines with ADX threshold analysis, generating filtered trend states that distinguish genuine trends from temporary price fluctuations.
🔶 Dynamic Trend Strength Engine
Implements sophisticated strength calculation combining slope intensity and ADX readings to produce normalized 0-100% strength scores with gradient colour intensity modulation. The system normalizes slope by minimum threshold and ADX by configurable level, multiplying factors to create composite strength measurement that drives visual feedback intensity across all indicator elements.
🔶 Super Trend-Style Direction Logic
Utilizes classic Super Trend methodology adapted for SMA-MAD bands, where trend direction flips occur on opposite band violations with persistent state maintenance. The system tracks previous band levels with ratcheting behaviour that adjusts bands only when price movement or new calculations warrant changes, preventing oscillation during normal volatility.
🔶 ATR-Based Ribbon Visualization
Provides dynamic ribbon overlay using ATR-scaled width around the trend line with opacity modulation based on trend strength for intuitive conviction assessment. The system creates upper and lower ribbon bounds at configurable ATR multiples, filling the channel with gradient-adjusted transparency that increases during strong trends and fades during weak conditions.
🔶 Multi-Dimensional Visual Architecture
Provides complete chart integration through trend line overlay, ATR ribbon fills, candle colouring, background glow, and transition signal labels with configurable visibility toggles. The system enables traders to customize display density from minimal (trend line only) to comprehensive (all visual elements) while maintaining consistent colour scheme and strength-based intensity across components.
🔶 Slope Strength Validation
Calculates ATR-normalized slope over configurable lookback periods to measure trend line momentum and filter sideways price action. The system compares absolute slope against minimum threshold requirements, preventing trend signals when price movement relative to the trend line lacks sufficient directional conviction regardless of band position.
🔶 Signal Generation Framework
Generates trend change signals when filtered direction state transitions from bearish to bullish or vice versa, with label placement and alert integration. The system implements state persistence that maintains previous trend until both ADX and slope filters confirm directional change, reducing whipsaw signals while capturing genuine reversals with minimal lag.
🔶 Performance Optimization Framework
Utilizes efficient calculation methods with optimized variable management and configurable parameters for balance between responsiveness and stability. The system includes intelligent state tracking with NA handling for initial bars and smooth gradient calculations that maintain performance across extended historical periods and real-time updates.
This indicator delivers sophisticated trend identification through Mean Absolute Deviation methodology combined with dual-strength filtering for superior signal quality. Unlike traditional Super Trend indicators that rely solely on ATR bands, the SMA-MAD approach uses statistical deviation measurement while incorporating ADX strength and slope validation to eliminate false signals during choppy conditions. The system's gradient-based visual feedback, ATR ribbon visualization, comprehensive dashboard, and multi-dimensional filtering make it essential for traders seeking reliable trend-following approaches with clear conviction measurement across cryptocurrency, forex, and equity markets. The combination of adaptive bands, strength-based transparency, and intelligent filtering creates an institutional-grade trend system suitable for systematic trading strategies.

Orderblock Footprints [AlgoAlpha]🟠 OVERVIEW
This script highlights orderblocks and then drills into what actually trades inside them. Zones are created only after an abnormal directional impulse, measured with a z-score on consecutive candle bodies, so the orderblocks are tied to real expansion rather than simple pivots. Once a zone exists, the script overlays lower-timeframe volume footprints inside the candle when price trades back into that zone. The goal is to show not just where an orderblock sits, but whether price is being accepted or absorbed when it is revisited.
🟠 CONCEPTS
Orderblocks are detected after extreme bullish or bearish impulses. The script tracks consecutive body movement up or down, normalizes that distance with a rolling z-score, and only triggers when the move is statistically large. The last opposite candle before that impulse defines the orderblock range. These zones then extend forward until they are either mitigated by price closing through them or they expire by age.
Inside an active zone, the script switches to a lower timeframe and builds a footprint-style profile for each bar. Each candle is split into price rows, counting time-at-price and volume delta. Positive and negative delta are colored separately. Absorption is flagged when opposing delta prints appear in the wick that rejects the zone. In practice: the impulse defines context ; the footprint shows interaction .
🟠 FEATURES
Separate bullish and bearish zones with automatic extension
Volume split inside each zone candle (up vs down volume)
Lower-timeframe footprint with TPO-style rows and delta gradient
Absorption detection using opposing delta in rejection wicks
Alerts for zone creation and absorption events
🟠 USAGE
Setup : Add the script to your chart. It works on any market and timeframe. The lower timeframe for footprints is fixed at 5 minutes, so higher chart timeframes show clearer structure. Use the Z-Score Window to control how strict impulse detection is and Max Box Age to limit how long old zones stay on the chart.
Read the chart : Bullish orderblocks are created after strong upward impulses and are invalidated when price closes below them. Bearish orderblocks are created after strong downward impulses and are invalidated when price closes above them. When price trades inside a zone, footprint rows appear. Green-tinted rows show positive delta; red-tinted rows show negative delta. Absorption labels appear when opposing delta prints into a rejecting wick.
Settings that matter : Increasing the Z-Score Window makes orderblocks rarer but more significant. Disabling Prevent Overlap allows stacked zones if you want to study clustering. Adjusting Rows per bar changes footprint resolution—lower values are cleaner, higher values show more detail but use more objects.

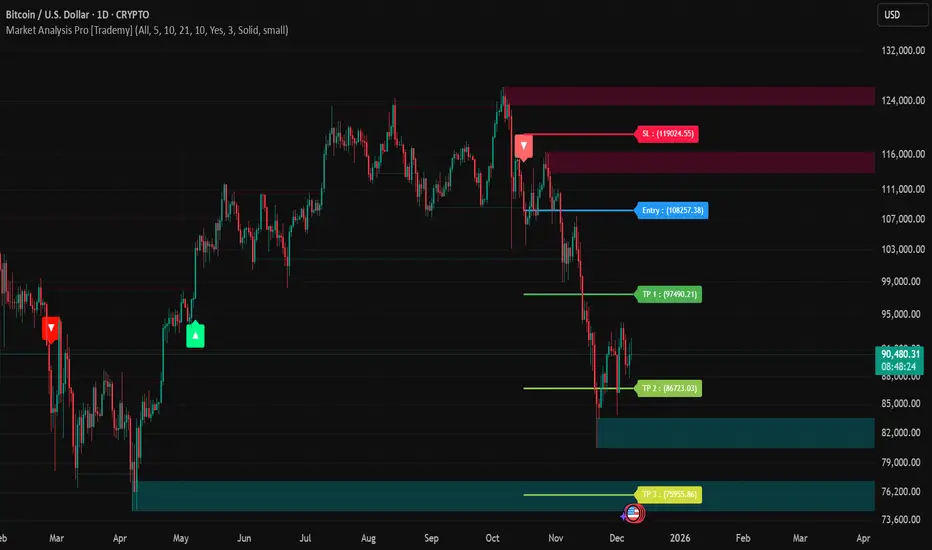
Market Analysis Pro [Trademy]OVERVIEW
Trademy Market Analysis Pro is a professional-grade trading system that combines advanced momentum analysis with institutional-level Supply/Demand zone mapping. This indicator is designed to provide crystal-clear market analysis with precise risk management tools, creating a complete trading framework within a single, streamlined interface.
Unlike complex indicators that overwhelm traders with information, Trademy focuses on what matters: high-probability setups with clear entry points, defined risk levels, and multiple profit targets. The system is built to eliminate guesswork and provide actionable signals that work across multiple timeframes and asset classes eg: ( INDEX:BTCUSD , NASDAQ:NVDA and more )
CORE CONCEPTS
Advanced Momentum Engine: The foundation of Trademy Market Analysis Pro is a proprietary momentum detection system that identifies true directional shifts in the market. The algorithm analyzes price behavior relative to volatility-adjusted dynamic levels, generating signals only when genuine momentum reversals occur. The "Signal Sensitivity" control allows you to adapt the system from conservative (fewer, higher-quality signals) to aggressive (more frequent opportunities) based on your trading style and market conditions.
Institutional Supply/Demand Zones: The system automatically identifies and plots key institutional levels where significant buying (Demand) or selling (Supply) pressure has occurred. These zones are calculated using advanced price structure analysis, filtered through intelligent overlap detection to ensure only the most relevant zones appear on your chart. When price approaches these levels, they often act as strong support or resistance, providing logical areas for entries and exits.
Intelligent Signal Classification: Not all signals are created equal. Trademy categorizes every signal as either "Normal" or "Strong" based on its alignment with the broader market structure and trend context. Strong signals represent higher-conviction setups where momentum and trend align perfectly, while normal signals indicate counter-trend or early reversal opportunities.
Non-Repainting Architecture: Every signal is locked in at bar close (when enabled), and all TP/SL levels are calculated using volatility measurements captured at the moment of signal generation.
KEY FEATURES
Precision Signal System
Dual Signal Modes: Choose between Normal signals (standard momentum reversals) or Strong signals (high-conviction trend-aligned setups), or view both simultaneously
Wait for Bar Close: Optional no-repaint mode ensures signals only appear after candle confirmation
Visual Signal Hierarchy: Normal signals shown with standard arrows (▲/▼), Strong signals marked with distinctive colors for instant recognition
Adjustable Arrow Sizes: Customize signal display from tiny to large based on your chart preferences
Professional Risk Management
Automated TP/SL Calculation: Three take-profit levels (TP1, TP2, TP3) and one stop-loss level automatically calculated using advanced volatility measurement
Fixed Risk Levels: TP/SL lines are locked at signal generation and never move—providing consistent, reliable risk parameters
Visual Risk Zones: Optional colored zones highlight your risk and reward areas for instant position assessment
Adjustable Risk Multiplier: Scale your targets up or down with a single parameter while maintaining proper risk-reward ratios
Clear On-Chart Labels: Every level displays exact price values in an easy-to-read format
Supply/Demand Zone Mapping
Automatic Zone Detection: System identifies high-probability supply and demand zones using advanced price structure analysis
Anti-Overlap Algorithm: Intelligent filtering prevents zone clutter by removing overlapping levels
Extended Zone Projection: Zones extend into the future, showing you key levels before price reaches them
Break-of-Structure Tracking: Monitors when zones are broken and removes invalidated levels
Fully Customizable: Adjust zone colors, swing length, history depth, and box width to match your analysis style
Visual Customization
Flexible Color Schemes: Customize colors for bull/bear signals, TP/SL levels, and supply/demand zones
Trend Background: Optional background coloring to instantly visualize the current market bias
Support/Resistance Lines: Toggle automatic S/R level plotting from key price pivots
Multiple Arrow Sizes: Choose from tiny, small, normal, or large signal arrows
WHAT MAKES TRADEMY MARKET ANALYSIS PRO DIFFERENT
✅ Simplicity Meets Power
✅ TP/SL Levels
✅ Institutional Zone Integration
✅ Universal Indicator for all markets
✅ Multi-Timeframe Flexibility
BEST PRACTICES
📌 Always Use Stop-Loss: Enable the TP/SL system and respect your stop-loss levels,risk management is key to long-term success
📌 Backtest First: Before live trading, replay historical charts to understand signal behavior on your specific asset and timeframe
📌 Combine Timeframes: Use higher timeframe signals as your bias, enter on lower timeframe signals in the same direction
📌 Watch the Zones: Highest probability setups occur when signals align with supply/demand zones (buy near demand, sell near supply)
📌 Don't Chase: If you miss a signal, wait for the next one,forcing trades leads to losses
📌 Partial Profits: Consider taking partial profits at TP1, moving stop to breakeven, and letting the rest run to TP2/TP3
📩 ACCESS & SUPPORT
This is an invite-only indicator. For access inquiries, please contact via TradingView private message.
Important Disclaimers:
This indicator is a tool for technical analysis and does not constitute financial advice
Past performance does not guarantee future results
Always practice proper risk management and never risk more than you can afford to lose
Trading carries substantial risk of loss and is not suitable for all investors