OPEN-SOURCE SCRIPT
Aktualisiert ﴾҂﴿ Open Positions
OVERVIEW
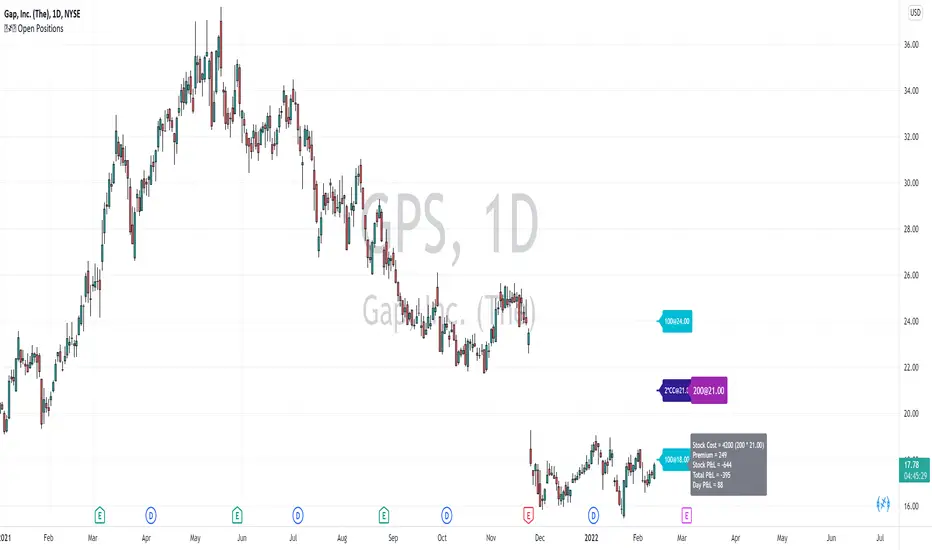
If you follow the options trading approach similar to Markus Heitkoetter, then
you would usually have a fixed/max number of positions, and for some of those positions, you will have assigned stocks. If you flew any
rescue missions, you might even have more stock positions assigned at different strike prices.
This indicator visualizes for you the different positions that was assigned, your current average price, a possible place for the next
rescue mission and current open trades.
A note on Trading View and indicators and databases. What is not possible (today), is that an indicator can have different values
as you click through the charts. It is also not possible to have a database from where we can read the current positions (although
this would be a nice thing as feature). So, the way to solve the problem today is simply to have the fixed number of
positions as indicator parameters in a nice and easy format. The parameters are parsed and the if the underlying chart
has existing positions, they are visualized.
The down side of this above (supported) approach is that once the indicator is removed and placed back on the chart, all data stored
as parameters are lost :(.
The "simple" workaround is that we "store" our data inside "code" --> let us make you a programmer in 3 simple steps!
1. If you have read up to this point, then you already have the code open in Pine Editor. The first step is to make a copy of the code. Look at
the right of the screen for "○○○" button and then select the option "Make a copy...". Give it a new name, recommended "[YourName] Open Positions".
2. Although it looks like nothing has changed, actually you are now reading the same text, but in your copy of the indicator. See towards the left of
the screen where the name is shown. So let us switch the indicator on the chart from the original to this copy.
(A) Remove the original indicator from the chart with "X"
(B) Towards the right of the screen is "Add to Chart" option to add this indicator to the chart.
3. Last step is to add all your positions in the code. Simply scroll down a few lines and ONLY modify between "↓↓↓" and "↑↑↑". There are very detailed
instructions on exactly what you may do and should do. Don't do anything else :). Each time after you are finished, simply press "Save" on the
right of the screen. You can close the Pine Editor with the "__" button on the right.
*. If one day you have more positions to update, simply use the "{}" option next to your indicator to land again here in the source code, and repeat
step #3 as many times as you wish.
Versionshinweise
UPDATES v2- Added the multi-position line concept to paste open trades directly from Excel. --> Please read the text at the top of the code for detail information.
Versionshinweise
UPDATES v3- Fixed a stupid typing mistake! :(
Versionshinweise
UPDATES v4- Fixed small indexing mistake.
Versionshinweise
UPDATES v5- Slightly changed rescue point from 33% to 30%
- Rescue point is only visualized if price is down more than 10% from lowest strike (to reduce clutter on the chart, only show when it becomes a factor)
- Do NOT show the "average cost basis" when only one trade!
- Stripped the -PUT/-CALL syntax (which only Brian likes) from documentation in favour of the standardized CSP/CC and/or SC/SP syntax
- Add a quantity parsing for contracts, for example 2*CSP@130, which would translate to a possible added 200 stocks
- Based on the extra short PUT positions compute a possible new "cost basis" on assignment
- In cases where multiple trades at same strike, merge trades into one label
- Change date string separater to ">", but still keep backwards compatible the "[]" sequence for this release
Versionshinweise
UPDATES v6- Added P&L Label
Versionshinweise
UPDATES v7- Cosmetic changes....
Versionshinweise
UPDATES v8- Stripped out the code modify option. Basically nothing really changed.
- Added a few more slots for people with slightly larger dry docks :)
Versionshinweise
UPDATES v9- Added support for CASH|Premium|Credit
- Changed slightly sequence of code so that the more "important" labels are on-top if there is an overlap.
- Removed "Show Compact Labels" as it did not seem to work -- email me if required back!
Versionshinweise
UPDATES v10- Small cosmetic change in one label.
Open-source Skript
Ganz im Sinne von TradingView hat dieser Autor sein/ihr Script als Open-Source veröffentlicht. Auf diese Weise können nun auch andere Trader das Script rezensieren und die Funktionalität überprüfen. Vielen Dank an den Autor! Sie können das Script kostenlos verwenden, aber eine Wiederveröffentlichung des Codes unterliegt unseren Hausregeln.
Haftungsausschluss
Die Informationen und Veröffentlichungen sind nicht als Finanz-, Anlage-, Handels- oder andere Arten von Ratschlägen oder Empfehlungen gedacht, die von TradingView bereitgestellt oder gebilligt werden, und stellen diese nicht dar. Lesen Sie mehr in den Nutzungsbedingungen.