Market Cycle Strength# Market Cycle Strength (MCS)
## Overview
Market Cycle Strength is a comprehensive composite indicator that synthesizes six key market health metrics into a single score ranging from -100 to +100. The indicator is designed to help traders assess the current market regime and identify potential turning points by analyzing multiple dimensions of market structure simultaneously.
## How It Works
### Components
The indicator combines six distinct market signals, each weighted by default as follows:
| Component | Weight | What It Measures |
|-----------|--------|------------------|
| **Momentum (30%)** | Price trend strength via SPY's position relative to 50/200 SMAs, golden/death cross status, and rate of change |
| **Credit Spreads (20%)** | Risk appetite through HYG/LQD ratio (high yield vs investment grade bonds) |
| **VIX Structure (20%)** | Fear/greed levels and volatility regime |
| **Market Breadth (15%)** | Participation via RSP/SPY ratio (equal weight vs cap weight performance) |
| **Sector Rotation (10%)** | Leadership patterns by comparing cyclical sectors (XLK, XLY, XLF, XLI, XLB) against defensive sectors (XLU, XLP, XLV, XLRE) |
| **Yield Curve Proxy (5%)** | Flight-to-safety signals via TLT/SHY ratio |
### Score Interpretation
The composite score maps to six market regimes:
- **Strong Bull (+50 to +100)**: Broad strength across most components - healthy expansion
- **Bull (+25 to +50)**: Generally positive conditions with some caution areas
- **Weak Bull (0 to +25)**: Positive but deteriorating - correction risk rising
- **Neutral (-25 to 0)**: Mixed signals - unclear direction, increased caution warranted
- **Bear (-50 to -25)**: Multiple stress indicators present - defensive posture recommended
- **Strong Bear (-100 to -50)**: Significant market stress - crisis conditions
### Contrarian Application
Historical backtesting suggests this indicator has **contrarian value** at extremes:
- Extremely bearish readings (below -25) have historically preceded above-average forward returns
- Very bullish readings (above +70) may indicate complacency rather than a buy signal
The dashboard displays a "CONTRARIAN: BUY SIGNAL" when the score drops below -25, highlighting potential accumulation opportunities.
## How To Use
### Setup
1. Apply the indicator to any chart but SPY is recommended (it fetches all required data via `request.security`)
2. The indicator works best on daily timeframes for regime analysis
3. Adjust component weights in settings if you want to emphasize certain signals
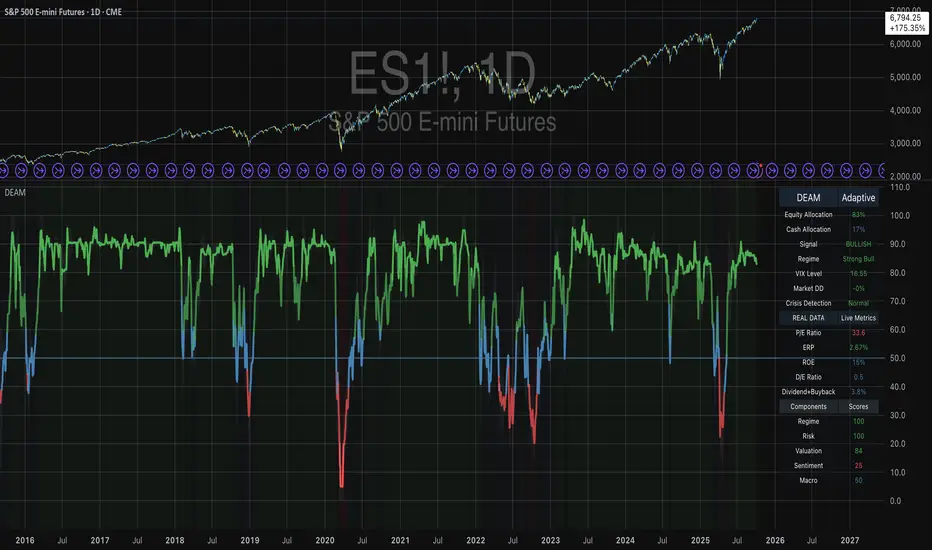
### Dashboard
The table displays:
- **Composite Score**: Overall market health reading
- **Regime**: Current market classification
- **Component Breakdown**: Individual scores for each of the six inputs
- **Status Flags**: Golden/Death cross, credit health, sector leadership, etc.
### Alerts
Four alert conditions are available:
- **Strong Bull Entry**: Score crosses above +50
- **Bear Warning**: Score crosses below -25
- **Contrarian Buy Signal**: Extreme bearish reading (potential opportunity)
- **Regime Change**: Any transition between market regimes
## Best Practices
1. **Context Matters**: Use alongside price action and other analysis - no indicator works in isolation
2. **Timeframe**: Most reliable on daily charts; intraday may produce noise
3. **Extremes Are Signals**: Pay special attention when the score reaches extreme levels in either direction
4. **Component Analysis**: Check individual components to understand what's driving the composite score
5. **Confirmation**: Wait for regime changes to be confirmed by multiple components, not just one
## Inputs
- **Component Weights**: Customize the importance of each signal (default weights sum to 1.0)
- **Show Dashboard**: Toggle the information table on/off
- **Show Zone Background**: Toggle colored zone fills
- **Table Position**: Move dashboard to any corner
- **Alert Thresholds**: Customize notification trigger levels
## Data Sources
The indicator pulls data from:
- SPY, RSP (market proxies)
- HYG, LQD (credit markets)
- TLT, SHY (bond markets)
- VIX (volatility)
- XLK, XLY, XLF, XLI, XLB (cyclical sectors)
- XLU, XLP, XLV, XLRE (defensive sectors)
## Limitations
- Requires access to US market data (best results with TradingView's data feeds)
- Historical data needed for SMA calculations (200+ bars minimum)
- VIX term structure (VIX3M) not available on TradingView, so that component is omitted
- Works best as a daily regime indicator, not for intraday timing
## Acknowledgments
This indicator synthesizes concepts from multiple areas of market analysis including momentum trading, credit cycle research, volatility analysis, and sector rotation theory. The composite approach aims to provide a holistic view of market conditions rather than relying on any single metric.
---
**Disclaimer**: This indicator is for educational and informational purposes only. It does not constitute financial advice. Past performance of any methodology is not indicative of future results. Always conduct your own research and consider your risk tolerance before making trading decisions.
Pine Script® Indikator